Ahuitech is a website prepared especially for the latest version of Nextcloud updates. This is a step by step manual guide.
Nextcloud is a self-hosted productivity application software platform on Ubuntu or other Linux systems that keeps you in total control of all your Data! You can use this latest Nextcloud version for free. Create your awesome remarkable cloud system today!
Privacy Policy – You act on your own accord and risk – No Warranty.
It’s a very good idea to schedule regular backups times from 00:00:00 (Sunday) to 23:59:59 (Saturday) of your Nextcloud system. Including at least the following folders: 1. the webfolder: /var/www/nextcloud 2. the datafolder: /var/nc_data/appdata 3. and the database: nextcloud.
Please substitute ubuntu username and the database password nextcloud with yours. Enter into sudo mode:
Restore your Nextcloud using the following process. Including the following folders: 1. the webfolder: /var/www/nextcloud 2. the datafolder: /var/nc_data/appdata 3. and the database: nextcloud.
Remember to substitute ubuntu username and the database password nextcloud with yours. Enter into sudo mode:
After restoring a backup of your data directory or the database, you should always call maintenance:data-fingerprint once. This changes the ETag for all files in the communication with sync clients, allowing them to realize a file was modified.
Congratulations, you now have your own personal data on your own secured Nextcloud 18 system backup and restored!
At Ahuitech, we create clouds systems that allow you to have complete control of your Data. You are always in Control!
Done!
An alternative method to backup Nextcloud
The following backup procedure is probably the easiest way to insure you always have a complete Nextcloud system backup including all your data.
This is based on using VMware vCenter Server Appliance (VCSA) application software.
Right click Nextcloud VMware server and select Clone to Template.
Click on image to enlarge
2. Enter Virtual Machine name. 20200308_1556-ubuntu18vm21-c1-temp-usb1-57 and click Next.
Click on image to enlarge
3. Select ESXi host 10.1.100.41 and click Next
Click on image to enlarge
4. Select storage and virtual disk format: usb1-1-1.82t and Thin Provision, then click Next
Click on image to enlarge
5. Ready to complete and click Finish to begin cloning the virtual machine to template
Click on image to enlarge
You have completed the process of backup! Done!
An alternative method to restore Nextcloud
In order to restore Nextcloud and all your data, please follow this procedure below.
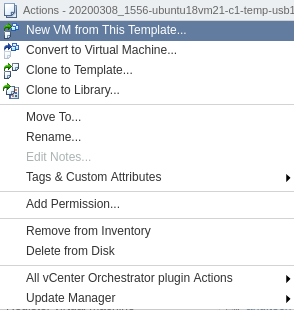
Right click on the Template and select New VM from This Template…
Click on image to enlarge
2. Enter Virtual Machine name. ubuntu18vm21-c2 and click Next.
Click on image to enlarge
3. Select ESXi host 10.1.100.41 and click Next
Click on image to enlarge
4. Select storage and virtual disk format: sdb1-1-1.82t and Thin Provision, then click Next
Click on image to enlarge
5. Select clone options, or select none and then click Next
Click on image to enlarge
6. Ready to complete and click Finish to begin cloning the template to a new virtual machine!
Click on image to enlarge
The above cloning procedure is an excellent process to restore your Nextcloud system and data.
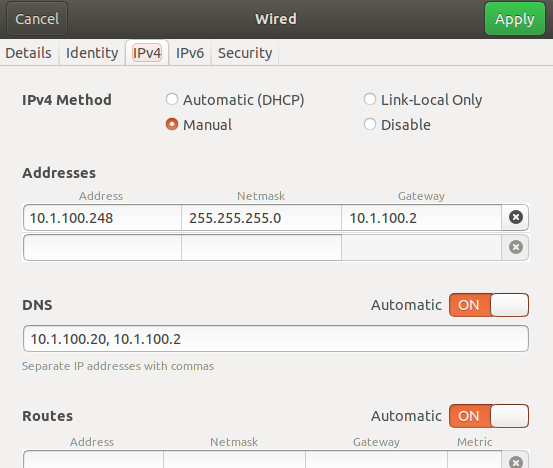
After powering on the new ubuntu virtual machine, you may need to edit Wired Settings to your network environment in order to completely restore and control nextcloud system. Please review image below as an example.
Click on image to enlarge
Congratulations, you now have your own personal data on your own secured Nextcloud 18 system backup and restored!
At Ahuitech, we create clouds systems that allow you to have complete control of your Data. You are always in Control!